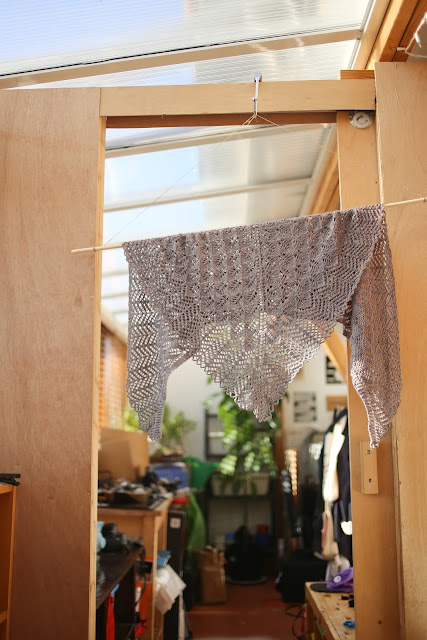
Shine!

Thursday, 31 December 2015
Oh it's finally here!

Shine! Is live on Ravelry!


I have been working on this project since early 2015 and it feels so good to be finally able to show everyone!

Of course I decided to be a big dork and model it myself!


HATS SO MANY HATS

Tuesday, 15 December 2015
Hey everyone!

I published a couple of hat patterns!

One is December, a big black quick-to-knit squishy pile of stockinette with a pom pom attached at the top! It's only got something like 1300 stitches ALL TOGETHER so it shouldn't take you that long to knit. If you've got a pair of large-ass knitting needles already, than this pattern is going to call out to you across the street until you notice it.

Oh, and it's on my face in the photos, which is nice. I'm trying to model my own stuff a bit more instead of constantly haranguing my friends to model for me.


This one is Joy! It's the sister-hat to Swoon another one of my hat patterns. It's just a good solid 1x1 ribbed hat, it likes long walks on the beach and the smell of hair after it's been washed. The original sample was knit using ANGORA which made me get a bit strange while I was knitting it. It is just such a soft amazingly... soft yarn. I don't think there are other descriptors for it really even. It was just me going "soft... soft... soft... kittens... soft" while I was knitting. I might have also been drooling - but not on the hat... I promise.


My lovely friend Savanna modelled this one!


New pattern - Lanterns!

Friday, 27 November 2015
So I've been working on a set of 4 shawls out of Plucky Knitter yarns. I've already published Grateful Moments out of the amazing Oxford yarn. And this pattern is out of their amazing Primo Fingering.

It's called Lanterns and I have been working on it for ages and ages. These new patterns that I have upcoming are different than a lot of my older patterns. They're delicate in a way that I hadn't ever played around with before. The fingering weight yarn makes them light but very warm still, and they're just a real pleasure to wear.

I'm sure I'll be back to my normal after this collection is finished. But for now I'm just basking in the glow of all these fingering weight beauties. It's really been a pleasure working with them!

So here it is!

Lanterns! 


As always come take a look at what I'm doing on Instagram! @softsweater
If you're interested in keeping up with projects people have knit of this shawl check out the #lanternsshawl hashtag.

Lots of love! Happy knitting!

The Teach-Your-Friend-To-Knit-A-Hat Hat!

Friday, 6 November 2015
New pattern and it's FREE! 


Alright, well that was a lazy little blog update! I'm going to go back to lying in bed watching Bob Ross paint happy trees! No lying that's my plan for this lovely evening.

The Lonely Tree in German! And also an update for Small Bones

Thursday, 5 November 2015
Hey everyone!

Thomas has finally finished translating the Lonely Tree into German! It's awesome and up and available on Ravelry.com!


What does it all mean? I don't actually know. 
OH ALSO

I've also updated Small Bones to include more easy-to-read instructions, written instructions as well as a new shiny chart! 


She's excited it's updated! 


You're all awesome! Thanks for reading!

Porteau Cove! A Pattern By Tiny Island Textiles

Sunday, 1 November 2015
The lovely Nicola Hodges from Tiny Island Textiles has put up her gorgeous stole pattern Porteau Cove out into the world! It's downloadable on Ravelry.com! Here's the link.

Porteau Cove


I'm so happy about this pattern coming out! It's sort of a proof of concept for me! Because it's the first pattern to be helped along with the Graph Paper Cooperative in mind. 

Me and Nicola have been friends for ages and ages and she's always helped me really heavily with my designs. She has test-knitted the Lonely Tree, she has knitted samples for me, she has modelled for 6 of my patterns, she has read through my patterns and my god she has blocked almost every lace thing I've ever knit. I can honestly say that her help has made my designing process one that is manageable for me and I credit a lot of my success to her! So in a sense the two of us have been doing this sort of Graph-Paper-Coop-y thing for a while now, unofficially. 

What is this Graph Paper Coop-y thing? Well, The Graph Paper Cooperative is a thing that me and Nicola thought up over a series of conversations about supporting local knitwear designers. Nicola's been a designer since I met her, but she had never published on Ravelry. And I've always struggled with a couple of aspects of knitwear design, and have needed her support. 

The Graph Paper Cooperative was based on the idea that you need a whole pile of skills to publish patterns on Ravelry. You need to know how to design a pattern, write out the instructions so other people can knit them, you need to knit good samples out of nice yarn and have the pattern photographed beautifully and beautifully layed out and then you need to send it to testers who can give you feedback on all of those aspects of your pattern so you can tweak it further. 

It's a big process and if you're missing any of those skills it can make it really hard to self publish your own patterns. Or you may publish them but have them met with a "meh" because one or more of those pieces is missing. 

The Graph Paper Cooperative fills in the blanks so that people don't need to have absolutely every skill involved in publishing. and if you want the skills you can mentor and develop them with us. Or, if you're part of the cooperative, you can just ask for help from the other members. 

In the way that I've been asking for help from Nicola for ages, with blocking and modelling and pattern testing and sampling. And she was able to get some assistance from me with publishing Porteau Cove! 


It's Cooperative magic. 

We sat down a couple of weeks ago at my favourite coffee shop and I pulled up InDesign and we built a Tiny Island Textiles Knitwear Pattern template for her, and then we started putting the pattern together (with some photos I took from 2012 when she first designed this beautiful thing!). And now it's published and I'm just plain stoked! I hope you'll pop over and buy a copy. It's been made with love and it really is the best thing to just have a huge pile of lace knitting wrapped around your body. Also it helps support Nicola on her adventures being an awesome person who lives on a Tiny Island, raising sheep and building a textile studio cabin with her own two hands. Lovely! 


M1W - Make 1 Weird and the Elder Tree Shawl

Wednesday, 28 October 2015
Hey knitters -


So I realized that when I wrote the Elder Tree shawl I talk about a Make 1 without specifying what kind of make 1 I was talking about. This is because I thought Make 1 meant just grabbing the bar underneath and knitting into it without twisting it. It makes this nice little lace hole as if you'd done a yarn over on the other side. I swear someone taught me that but I can't remember who and I can't seem to find anything on the internet about it.


So I've made my own little tutorial video to explain it to folks who are asking.


I'm calling it a Make 1 Weird because I'm weird and I use this to make 1.

Honestly all the hundreds of projects out there that have been using twisted make 1s in the Elder Tree all look absolutely beautiful. A twisted make 1 is great for this pattern too - but I just wanted to let folks know what I was talking about when I was saying Make 1 and here it is!

I'm designing another shawl which uses this increase as well. It's a really good increase for increasing along a lacy spine because it doesn't stop the yarn over looks. I'm a bit in love with it. It also helps with fitting leafy shapes into a triangle shape. It's really been a lovely invention of sorts. Here's a picture of the side of the Elder Tree chart so you can see what I'm talking about. It's the M nestled next to the two yarn overs.


So let's just pretend I made it up so I can have a very own stitch! I feel a bit like Elizabeth Zimmerman right now.


Oh speaking of Elizabeth Zimmerman...


Whoa what!? Knitter Punks, the front page of iTunes, and 100,000 blog pageviews!

Tuesday, 27 October 2015
Hey everyone! This week has been pretty great, lots of fun stuff has been happening in my life and I'm feeling like making a little blog post about it might be a good idea!

The Knitter Punks Podcast (of which I am half of) made it on to the front page of iTunes under the New and Noteworthy heading! We were up there alongside Lena Dunham's new podcast! Which personally was kind of mind blowing.

Here's a screen cap of the big event:

Front page! You didn't even need to hit the "See All" tab to see it!


And then I realized that I hit 100,000 pageviews on this humble little blog! Wow guys! You all seem to like what I have to say!


I want to thank all of your for listening, reading, knitting along and just being awesome supporters of my little knitwear business! 

Tutorial - How to use Instagram to edit your photos!

Monday, 19 October 2015

Me and my friend Tarot Card the crow are going to help show you three-and-a-bit tips to using Instagram to edit your awesome photographs! This ended up not being specifically about editing knitwear photographs - but it will all apply. Imagine Tarot Card's lovely feather patterns as a beautiful black beaded shawl.

My tips go as follows: 

1a. Ignore the filters -

As tempting as they might be, the filters are a trend which will likely pass (has already passed?). Things are popular and then fall out of fashion, just like clothes. Instagram filters did that really quickly. The filters which were SO COOL when they first came out are now dated and our eyes gloss over them. They’ve been overdone (for now). Of course they keep updating with new filters and I’m sure there are lots that are sweet and might fit perfectly with your image. Just use your discretion, if everyone uses the same filter all the time, they will get boring. 

Dear Mayfair. I love you but we can't be together. Signed, Sylvia.

1b. Oh wait don’t ignore all the filters -

This of course doesn’t apply to the few black and white filters - Those are functional filters that will turn your images black and white.


Moon filter
Inkwell filter

There are many forms of black and white filters, ones that turn red to black, ones that turn blue to black, etc etc.

You can imagine how different those would look.

Especially with people’s faces. Red lips turn black or white depending on the filter. It can be an interesting thing to see. 

Just keep that all in mind when you're using B&W filters!


1c. Nevermind. Don’t ignore the filters -

There’s an option for choosing how intense the filter is on your image. Just click on the filter and then click on the filter again and a slider will show up. This was such a cool feature. If you have a filter you love but that’s just too intense for your taste you can bring the levels of the filter down so that’s it’s more normal and less intense! 

Rise filter at it's full capacity

Rise at a much subtler and more attractive (to my eyes) level!
Have fun play around. Remember photography rules are absolutely for breaking! I have to remind myself that all the time. 

2. Play around with exposure

If you read my last post on photo editing the next two points are going to be the exact same. A higher exposure level is going to give you a brighter, clearer, more optimistic looking image (if that’s what you’re looking for). It’s great for just increasing the natural light aspect of photos you’ve shot outdoors or by the window. It’s going to just bring to life your images.

Instagram’s exposure slider is great. Play around with it! Depending on the images you have you might want to have them all cloud-like and very lightly exposed or maybe you want them moody and you can pull the exposure down as well. 

Here's Tarot Card trying to eat my keys with no exposure editing at all.

To get to the exposure slider click on the little wrench icon on the right. It will show you all the non-filter editing tools under that icon. Very clearly marked!


Click on the "Brightness" button to get the slider to pop up. Now slide and play around! Here's the image of Tarot Card brightened up to my liking about about +60.


3. Play with the warmth slider.

The warmth slider is a lovely little invention. Because most images are shot looking kind of dull this slider will warm them all up to closer to what-the-eye-can-see levels of colour. Plus they just look so much livelier! 

Most shots only need a little bit of warmth added, this shot with Tarot Card did a 360 with the warmth slider all the way up to 100pts! Even if it feels like it's going to be a lot, try it out! Because of the brown of the leather and the ground and the green of the grass it really looks fantastic warmed up this much. 

Play around! Get a feel for it!


Here are the unedited version and the finished product for you to see!


 Thanks for reading my tutorial on how to use Instagram to edit your photos!


Tutorial - How to edit your knitwear photography using Adobe Photoshop Lightroom 3!

Sunday, 18 October 2015
Hey everyone!

Here’s a little tiny tutorial on how to get awesome shots using Adobe Photoshop Lightroom.

When someone asks me how I get the shots that I get I have two answers. 

One - make the people you're taking photos of laugh, having your photo taken is painfully stressful, make it as enjoyable as you can and if you need to tell them to act like a marmot for a couple of minutes to get them to laugh then it’s worth it.

Two - use Adobe Photoshop Lightroom to edit your photos.

Now I’ve got an old ancient copy of the program - but most of the tools I'll be talking about will be transferrable to the newer version. Maybe once I upgrade (haha yeah right - when some money falls out of the sky) I will do an updated one but for now this is a Lightroom 3 tutorial specifically for getting your knitwear photos to look awesome!

Whether you’re a knitwear designer or you just want to show off your beautiful finished object on ravelry these tips will help you out on your way to getting the shots you want.

Brighten it up -

DSLRs these days are built to produce images that need to be thrown through a post-processing program (like Lightroom). The images straight off the camera often have dull colours and low contrast and they’re dark. It’s actually intentional so that you can have more control over the final product when you move it over into post-processing.

With Lightroom almost everything is in sliders - it’s wonderful. 


Slide the “exposure” slider to the right to make it brighter. If you’ve got bright photos you want to darken you can slide to the left to make them moodier and darker.


For this image you can see the original on top there, and my edits done afterwards. I've just added +1.20 exposure. So I've just dragged the little slider up until it looked right to me. 

There, that’s like 75% of my process. 

Depending on the image you’re going to want to brighten it quite a bit - probably a little bit more than feels comfortable to you. as long as you don’t have any patches of white where all the detail is gone, then you’re good with a very lightened up image.

For photos you’ve taken with diffuse natural light (read: cloudy day or window light) you can push this quite a bit. Have fun and play around!

Warm it up -

This is the second most used feature for me on Lightroom. The "Temp" slider! (it's up at the top! of all the sliders for good reason!)

Most photos can be warmed up by 5 or 10 points. If you’re outside shooting in greenery (like a forest or even a park) you can warm up even more, like 15 or 25 points!


This feature is lovely and gives a lot of life to your photos, just make sure to keep an eye out for white things in your images turning yellow. Like if you’ve started to get a yellow tinge to people’s skin, eyes or teeth you might want to slide it back down to a slightly less warm alternative.

Here's the before/after of this image after bringing the exposure up as well as adding warmth. 


Here's another one of my images with the exposure up and warmed up. You can really see the difference!


Straighten your image -

So when photographers tell you they don’t straighten or crop because they want to take the photo “right” the “first time” then they are a strange breed of photographer. To each their own, but I have found that it’s unreasonable to think that straightening out an image would be such a taboo that they would risk a beautiful shot if it just needed a quick straightening out.

What do I mean by straightening?

Well if there are any lines in your photo that should be straight (say, a brick wall or a landscape or a fence) our eye notices. The only things in the photo that need to be straight are things our mind knows need to be straight. So things anchored to the ground, or say, the ground itself. Things which should be straight if you’re looking at them should be straight in your photo. Not to say that unstraight photos are the worst thing ever - it just takes our brain a little bit more time to “see” the image. And for clickability’s sake it’s best to just straighten the image out.


Here's an image of Savanna I have straightened. In the first one she looks like she's leaning forward or standing on her tippy toes because the horizon line is uneven. It just looks a bit off (which you might not notice right away) but when you see the straightened version your eyes go "ahhh, that's better!" 


If you're wondering what shawl she's wearing it's my The First Few Fallen Leaves shawl! You can see the rest of my shots on Ravelry! 

Well, those are the tips! Stay tuned for more! And feel free to ask questions in the comments and I’ll answer them to the best of my ability! If there’s interest generated I’d love to do a couple of posts where people send me their untouched images and I can touch them up and go through my explanation as to why I do what I do!

Sylvia’s Public Service Announcement:  Everyone’s way of editing photos is different and there’s no ‘right’ way. If we sat down with the same image and were just asked to brighten it - we would both end up with two results because our ideas of what a nicely brightened photograph looks like are going to be so completely different. Take my advice or find your own way to getting the most out of your photos!

KPM - Knits Per Minute!

Thursday, 15 October 2015
Just for fun today I timed myself for 2 minutes and counted how many stitches I could knit!

I worked 102 stitches in 120 seconds in just plain knitting.  I made sure not to rush (partially because the reason the thought popped into my head to do this was because I want to try and gauge how quickly I can finish these three garter stitch and stockinette projects I have on the go!)

So at this rate I could knit a stockinette version of the swoon hat in just over 51 minutes!

Wow dorky moments over here. Also if I knit that quickly I think my hands would actually fall off.


Knitter Punks Episode 12!

Monday, 12 October 2015
We've done twelve of these things! We're rocking things over here in Knitter Punks land. The podcast is so fun to do man I feel so lucky to be doing it! Go have a listen! 

The Knitter Punks Podcast! 


Also Jocelyn is awesome and totally finished her amazing Magrathea shawl! It's beautiful and I was eying it the entire time we were Podcasting! Shawls based on Douglas Adams fiction are THE BEST. Love it!


Softsweater's Sweater!

Friday, 9 October 2015
It's dry! Thomas took a couple of photos of me in it today! 


More Every Stitch Has A Story stuff.


I almost applied for the Story Hive grant... But then I decided not to! 


(storyhive is this awesome BC and Alberta grant you can apply for for short film makers. 
Take a look at www.storyhive.com) 

Instead I'm just going to use this video to promo the project that me n Nicola are working on. You might have seen the other video I embedded on here! This is the same footage, but it's my dorky voice you'll hear talking about the concept. Personally it gets me all excited to start thinking about making videos like this! So I'll share the Pitch video I made.

Click through to make it a bit larger! 


Thanks for taking a looksee! 

A history of softsweaters soft sweaters!

Thursday, 8 October 2015

Oh I have SO much knitting to do! So instead I'm going to write a blog post about all the sweater drama I have had in my short sweater-knitting life! 

My history of sweaters!

The first sweater I ever knit I didn't do a gauge swatch on. I got it wet to block it (lie it flat to dry) and it stretched so much it wouldn't even stay on my shoulders. I totally quit knitting for like a week I was so mad. 


I'm just so stoked with myself. Poor pre-blocked me. 


I'm looking so hopeful here! Little did I know...  blocking was about to happen.
The sweater was out of Malabrigo sock - which is gorgeous! But it's superwash and it's got no nylon content to spring it back... so goodbye adorable sweater! 

There are no photos of the big baggy thing post block.

The second sweater I did I did a gauge swatch! I was so proud of myself! I did a few and thought I was all smart because I even got my swatch wet and lied it flat to dry because "that's what I'm going to do with my sweater when I'm done!"

The thing I hadn't put into consideration is that when you're a 2x (and probably any size for that matter) the weight of the sweater is usually pretty heavy. You've got four or five skeins of yarn on there and it could weight like, 500grams.

When you get that wet it stretches itself to hell. It doesn't matter if you're lying it flat to dry, the step from removing the sweater out of the water and onto the towel will stretch it out. 

I took some photos of the finished product - because it technically did stay on my body - but it wasn't a very good fit on my frame. 


You can see the same problem again - the shoulders weren't staying on because the back piece had stretched out so much! 


All the gather of fabric is to keep it staying on my body. It just slipped off my shoulders the whole time.

Okay Third try worked out pretty well.

I knit a sweater for an ex boyfriend - but we broke up. Big surprise there... 
*cough* sweater curse *cough*


Of course the one sweater I knit that actually turns out awesomely is knit for someone else. 

Oh god.. I don't think this quite counts...


Then FINALLY I figured out that my gauge in time for the fourth sweater. My gauge is loose and sad and I need to actually step down quite a few needle sizes to get good sweater style gauge and I quickly whipped up this beautiful thing. 
Which is an Andi Satterlund pattern called Miette and it's short on purpose! I mean I'm also SUPERTALL but it's short for when I wear dresses! 


I'm a big dork in this photo! 

The pattern didn't come in my size so I had to do some modifications but it just turned out really well and I still wear it (although it needs some mending now). 

Okay so on to the newest of the sweaters. 

This is a sweater I started after I had been dumped last fall. It's my sad feelings-autumn is hard-I wish I had a fall sweater-sweater!

From fall to fall sweater out of Briggs & Little worsted. 


Is it a hat? Is it a sweater? Knitting and chatting at my office (Bump N Grind Coffee on Commercial Drive!) 


I have notoriously ridiculous sweater gauge. Here's me being like "IT'LL FIT RIGHT? IT'LL FIT?"


Here's a photo of me trying to fit into a child's sweater. "It says ages 2 and up!"
 Oh I love this yarn. you can really see the tweedy loveliness of it here! 


FINISHED! Hey look, the left sleeve has some discolouration on it? Gee I wonder why? Maybe it's because I ran out of yarn and was too lazy to go back to the yarn store to buy more so I just used a bit of Brooklyn Tweed Shelter that I had lying around. It's cute right? A design feature! Not a mistake... 

Powered by Blogger.

Followers

Back to Top